“Fall Pumpkin Towel Holder”
Designer: Aurora Suominen/DragonFlyMomof2
Designs©10-2015
Back:
Rnd 1: Ch4, 11dc in 4th ch from hook, join. (12dc)
Rnd 2: Ch3, dc in same st. 2dc in each st around, join. (24dc)
Rnd 3: Ch3, dc in same st, 2dc in each st around, join. (48dc)
Rnd 4: Ch3, dc in same st. [Dc in 3sts, 2dc in next st] Repeat around, ending w/dc in last 3sts, join, fasten off, weave in ends. (60dc)
Front:
Work the same as back, but DO NOT fasten off at end of rnd 4.
Place wrong sides of both pieces together, with right side of front circle facing you, work through both pieces.
Rnd 5: Slst in same st on both pieces, Ch3, dc in same st. (Dc in next st, 2dc in next st)6x, dc in 4sts, slst in 4sts, dc in 4sts. (2dc in next st, dc in next st)10x, hdc in 3sts, sc in 3sts, hdc in 3sts, (2dc in next st, dc in next)3x, join. Fasten off, weave in ends.
Towel Loop: Start row 1 w/long tail to sew onto pumpkin.
Row 1: W/A, ch16, sc in 2nd ch from hook and each ch across, ch1, turn. (15sc)
Rows 2-3: Sc in each st across, ch1, turn. (15sc)
Row 4: Slst in each st across, fasten off. Leave a long tail to sew to back of pumpkin at the bottom.
Hanger: 3 options for hangers, 1st and 2nd options are done during last row of stem.
If you are using the button hanger, see, “Hanger w/button” option below.
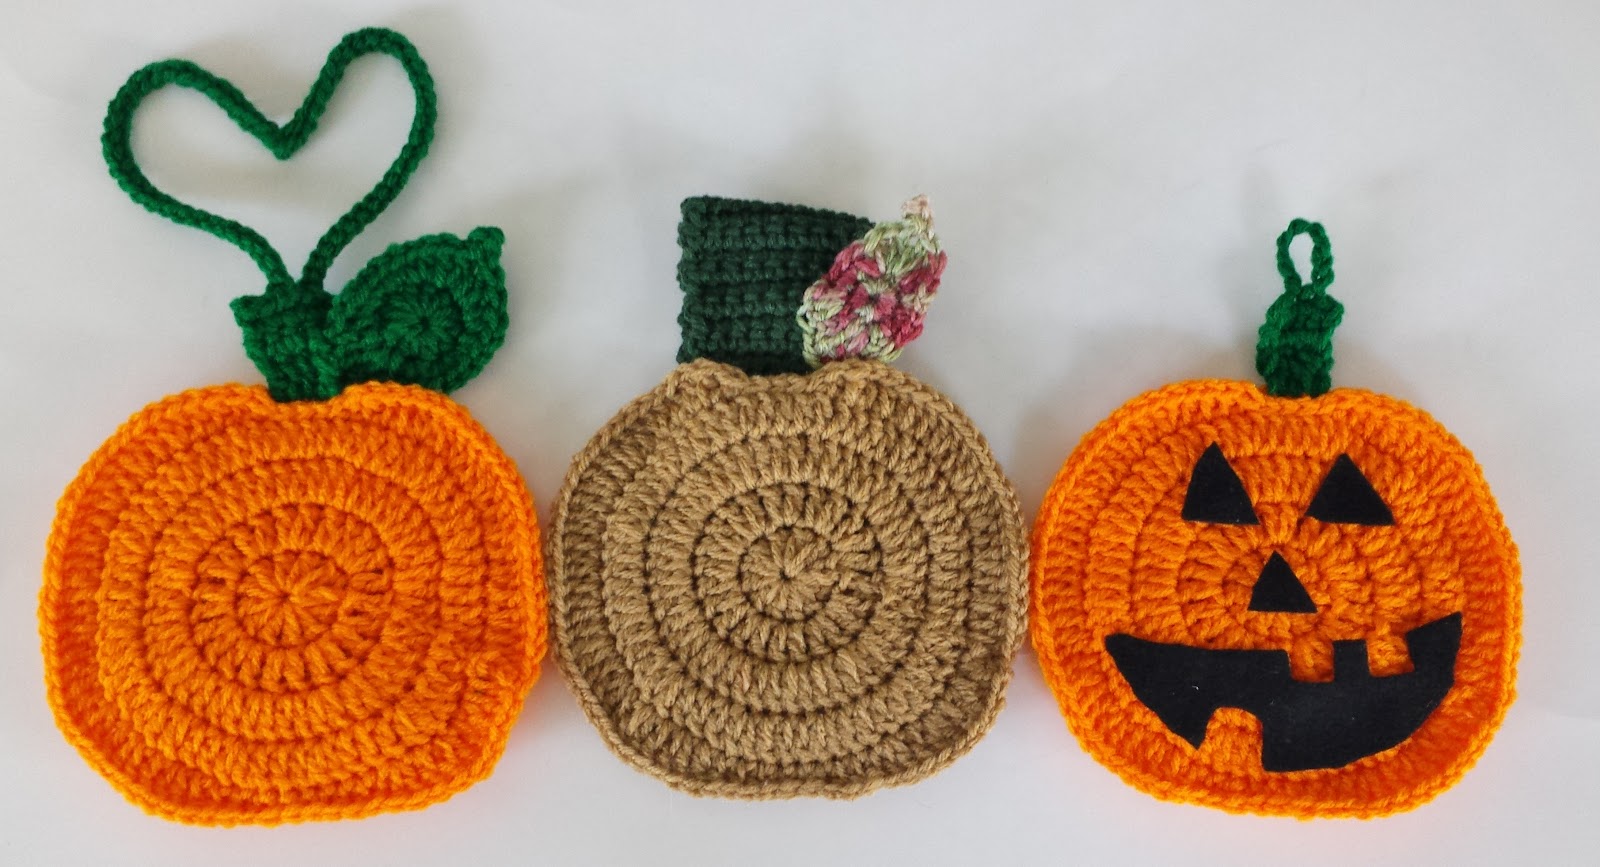
Stem W/Hanging Loop: (As shown in 3rd pumpkin of picture above)
Will be worked behind slsts at top, Do not work in the actual slsts.
Row 1: W/green, join in st behind first slst, ch3, dc in same st, dc in next st, 2dc in last st, ch1, ch1, turn. (5dc)
Rows 2-3: Sc in same st, sc in next 4sts, ch1, turn.
Row 4: Slst in next 2sts, ch12, slst in next st on stem, slst in last 2sts, fasten off, weave in ends.
Stem W/Ties: (As shown in 1st pumpkin of picture above)
Rows 1-3: Repeat as above.
Row 4: Slst in next 2sts, *Ch40, slst in 2nd ch from hook, and next 38chs, slst in next st of stem*, repeat *to* once more. Slst in last 2sts, fasten off, weave in ends.
Hanger W/button: (As shown in middle pumpkin of picture above)
If using this method, you can choose to leave out the stem as above and let the hanger take the place for stem. If you want stem like above, just follow Rows 1-3, and fasten off at end of row 3.
Start row 1 w/long tail to sew onto pumpkin.
Row 1: W/Green, Ch10, sc in 2nd ch from hook and each ch across, ch1, turn. (9sc)
Rows 2-26: Sc in each st across, ch1, turn. (9sc)
Row 27: Scdec, sc in next 5sts, scdec in last 2sts, ch1, turn. (7sc)
Row 28: Scdec, sc in next st, ch2, sk-1, sc in next st, scdec in last 2sts, ch1, turn (4sc)
Row 29: Sc in all sts, including chsp. (5sc) Fasten off, weave in ends
Attachment: Sew your button where you want it, I placed mine over rows 7-8, then decide on your placement, I sewed rows 1-9, with row 1 at the top of rnd 1 on back of pumpkin.
Leaves: (Optional)
Rnd 1: Ch2, 12sc in 2nd ch from hook, join in first sc. (12sc)
Rnd 2: Ch3, trc in same st, (trc, dc) in next st, 2hdc in next st, 2sc in next 2sts, 2hdc in next st, 2dc in next st, ch4, slst in 1st st of ch4, 2dc in next st, 2hdc in next st, 2sc in next 2sts, 2hdc in next st, join. Fasten off, leaving a tail to sew onto pumpkin, weave in ends.
Personal use/print only, no pattern reproductions, selling or copying allowed.
No comments:
Post a Comment